Showing posts sorted by relevance for query kneading. Sort by date Show all posts

Wednesday, February 04, 2009

(Quicker) No-Knead Bread

                                       from the kitchen


I have a secret loathing for recipes that require kneading.

There.

I said it.

What a weight lifted from these shoulders.

I really want to ENJOY kneading, because as someone who loves to cook, it is probably one of the most intimate cooking activities you can engage in, considering you're actually--well--fondling the food. Like wrist-deep in it. Thrusting and smooshing and squeezing and... well, you get the point.

But I don't like it.

It's tiring. And 10 minutes of kneading seems like a fricking eternity.

So I was pleased when I happened across this recipe on somebody's blog recently. I have no recollection of whose blog I originally saw it on, probably because I was entirely distracted by the excitement of a no-knead bread recipe. But thank you, whichever of you lovely vegans posted about it recently.

It's super easy-peasy. And it's yummy.

The consistency is wonderful. Crusty outside, FANTASTICALLY perfect inside. The flavor, although good, definitely could be spiced up a bit. So next time, I plan to add some roasted garlic and herbs. (I definitely recommend halving (or maybe even quartering) the salt quantity though, 'cause I only used 1/2 and it was a bit salty.)

It really is ridiculously easy. And it's fantastic for dipping in soup and/or olive oil.

Oh, and for those of you who--like me--are like, wtf is a dutch oven, you can easily half-ass it by tossing a circular casserole dish into the oven for 15 minutes or so before dumping the bread into it.

And you can now use that extra 10 minutes you didn't spend kneading to do something else instead.

Suggestions:

Kneading someone's boobies.

Kneading someone's ass.

Baking me cookies.

Baking me brownies.

Baking me cake.

Baking me bread.

Getting baked.

INGREDIENTS:
  • 3 c. bread flour

  • 3/4 t. regular yeast (not instant)

  • 1-1/4 t. salt [I recommend 1/4 to 1/2 t.]

  • 1-1/2 c. water

DIRECTIONS

Mix all the ingredients in the morning before you go to work. This should take about 3 minutes and leave you with a thick, slightly goopy dough. Cover with a towel or some plastic wrap and leave it in the warmest spot in your kitchen. (I tossed mine in my mixing bowl with some plastic wrap over the top of it and tossed it in my closet that has my furnace in it.) It should get a 6 to 8-hour rise.

When you come home from work lightly mist a counter or baking sheet with spray oil and turn dough out on it. Shape it roughly into a ball, mist with oil again, and cover with a towel or plastic wrap. (I shaped mine into a ball, poured a tiny bit of olive oil into the mixing bowl I'd had it in, and then tossed the ball into the mixing bowl and shook it around until it was coated in olive oil. I then covered the mixing bowl back up with plastic wrap and tossed it back in my closet.) Let proof for about an hour, or however long you have.

Heat the oven to 450-F. Put a Dutch oven (or an alternative, such as a casserole dish) in the oven to heat. When the dough has doubled in size, put it in the pan. You may have to pour it, pry it off the baking sheet, or just roll it in - the dough is very wet. Don't worry if it looks a mess.

Cover the pot with a lid and bake for 30 minutes. Remove lid and bake for another 15 minutes to let it brown.

You can be really sure that the bread is done when an instant-read thermometer inserted into the side of the loaf reads 210-220-F.

(Recipe from the kitchen)

Wednesday, October 14, 2009

Pizza Dough of Lurve

You know how we all sort of hope in our hearts that that certain someone will come along that will make us think, You complete me. Well, this pizza crust is that certain someone.


  1. No kneading. And if you've been reading this blog for more than 5 minutes, you already know how much I LOVE kneading. Cliff's note version: Kneading, you do NOT complete me.


  2. It takes a total of about 15 minutes to have this crust ready to pop in the oven. And as someone who typically comes home from work hungry enough to start devouring couches and small babies, this is important (especially to couches and small babies).


  3. It's really really good. Granted, the first time I made it, it BLEW MY EFFING MIND with how fluffy and delish it was, and it hasn't quite managed to live up to that state of orgiastic amazingness since. But even so: I've made it four times already. And every time I've enjoyed it. (I think the key to getting it fluffy may be -1- getting the water temperature correct, and -2- adding extra flour (the first time I added quite a bit more flour just because the dough was so tacky, and that's when it came out the best). I think I just parenthesized excessively, so let's toss in one extra end-parenthesis to make sure we close them all out.)


  4. After we made sweet love it -1- didn't fall asleep immediately, and -2- didn't go turn on the tv. It actually SNUGGLED. (Sike!)


As for variations on toppings: my standard go-to toppings are either pizza sauce or pesto sauce plus chopped kalamata olives and lightly-cooked sliced mushrooms and green peppers:


I also experimented with a mexican pizza (based on THIS Everybody Likes Sandwiches recipe as well), and for that, I first cooked the pizza for 10 minutes and then topped it with 1 small can of refried beans and some of the cheezy sauce from Veganomicon (which I actually think I could've just as easily left out since it didn't do much for it), popped it back in the oven for 15 more minutes, removed, and added salsa, sliced olives, and chipotle sour cream. This was AWESOME as well, and surprisingly filling (normally I eat half a pizza, but I could only eat three slices):


So yeah: TRY IT OUT I DARE YOU. Just don't get your current significant others pissed off at me when you DO fall deeply in love.


The Easiest Pizza Dough in the World

INGREDIENTS:
  • 1 packet of yeast

  • 1 c. warm water

  • 2-1/2 c. flour

  • 1 t. agave nectar (or 2 t. sugar; I recommend the agave though cuz MAN does it make the crust taste lovely)

  • 1 t. salt

  • 2 T. olive oil

  • 2 T. fresh rosemary, chopped (optional)

  • cornmeal

DIRECTIONS
Preheat oven to 400. In a large bowl, add in the yeast and warm water and stir until the yeast dissolves. Add the flour, salt, agave (or sugar), rosemary (if using), and olive oil and stir with a wooden spoon vigorously until combined. Let dough rest for 10 minutes.

Either sprinkle cornmeal onto a walled baking sheet and press dough into it until thin
-OR-
Sprinkle flour on your counter and roll out the pizza dough. Sprinkle cornmeal on a pizza stone and toss the dough on top. Spread olive oil over top (optional), and add all your toppings.

Bake for 20-25 minutes until pizza crust is golden and toppings are heated through.

(from Everybody Likes Sandwiches)

Monday, June 13, 2011

My Foccacia is Poofy

So I tried making foccacia last night using the recipe from Veganomicon. I would've thought it would be more difficult to mess it up than it would be to make it correctly, and yet: my foccacia turned out poofy.


Granted, it tastes really good. But it tastes like bread and not foccacia.

What did I do wrong? Too much kneading? Too little kneading? Too much water? Too little water?

Any thoughts about my poofy foccacia would be appreciated.

Also, is it just me, or does "poofy foccacia" not sound like a brilliant euphemism for lady nethers? Just sayin'.

Monday, November 30, 2009

THAAAAAAAAAANNNNNNNNNNNNNKKKKKKSSSSSSSSSSSSGIIIIIIIIIIIIVIIIIIINGGGGGGGGGGGGGGG!!!!

Cooked again for Thanksgiving (I swear November is a vegan food-blogger's wet dream) and had to pause to shout at you the following:

OH MY GOD GO MAKE BRYANNA CLARK'S VEGAN SEITAN "TURKEY" ASAP I DON'T CARE THAT IT'S NO LONGER THANKSGIVING AND YOU HAVE NO REAL EXCUSE!! ON A DISTANT PLANET SOMEWHERE IT'S LIKELY TO BE THANKSGIVING SO JUST RUN WITH THAT!! DO IT! NOW!


(Click on pic for larger version with stuff labeled)


Seriously, I was intimidated at first by the length of the cooking directions (which actually are short but look overwhelming because she supplies you with several variations), but it was surprisingly easy to put together. Granted, it cooks for about four hours, but GOOD LORD PEEPS! How often do you get to lavish in the delightful thanksgiving smell of roasting for four hours now that you no longer cook turkey? You'll love it, trust me. And if you have a breadmaker, this is as simple as dumping the ingredients in and pressing a button.

Tofurkey-haters take heed in particular: this is by FAR tastier than the tofurkey many of us turn to as a quick turkey-substitute around the holidays.

True story: My brother SPECIFICALLY ASKED that I give him leftovers of the faux-turkey for him to take home. (This, the boy who bitches every year about how crappy tofurkey tastes.) He also raved about making the leftovers into a sandwich.

My sister and mom (despite me telling them I made it myself—they sometimes don't listen well) days after Thanksgiving did a doubletake when they realized that I HAD indeed made it myself and both said they didn't realize it because it tasted so good.

So yeah.

AND it makes TWO loaves. So I'm STILL working through leftovers.

What else: If you make it, $100 billion dollars will spontaneously fall into your lap, it's THAT good. (Okay, THAT part's a lie, but the rest: TRUE AS MOTHERF-ING HELL.)

I'm also including the gravy recipe I used for both Thanksgiving and my vegan potluck as it tastes WONDERFUL with this faux turkey recipe.

And now: a pic of my fam at Thanksgiving in which it looks like my Mom and brother are praying but really they are both genetically deficient and chromosomally alike enough that they both accidentally closed their eyes for the pic.


My table-setting:


And now the recipes:

(I've chosen to include ONLY the directions that I used in making my faux-turkey, so if you'd like to see the variations, go check out the original which is linked at the end. Also: I recommend cooking it the night before and then just throwing it back in the oven with a tiny bit of water and, say, your stuffing or some other delightful numbly that you have to cook for 45 mins or so to reheat.)


BRYANNA'S SEITAN "TURKEY"

INGREDIENTS:

    DRY MIX:

  • 2 c. pure gluten powder (instant gluten flour; vital wheat gluten)

  • 1/2 c. full-fat soy flour or chickpea flour

  • 1/2 c. nutritional yeast flakes

  • 2 t. onion powder

  • 1 t. garlic granules

  • 1/4 t. white pepper


  • WET MIX:

  • 12 oz. firm regular (NOT silken) tofu

  • 1 & 1/2 c. water

  • 3 T. soy sauce

  • 1 T. olive oil


  • BASTING BROTH:

  • 2 c. hot water

  • 1/3 c. "chicken-style" vegetarian broth powder (I used 2 "chicken" bouillon cubes)

  • 2 T. olive oil

  • OPTIONAL: 4 cloves garlic, crushed

  • 1/2-1 tsp. poultry herbs (sage, thyme, rosemary), crushed well


DIRECTIONS

Wet Mix: In a blender, blend all the ingredients until very smooth.

Dry Mix: Place ingredients in the bowl of your electric mixer with dough hook attachment, or place them in the bread machine in the order given. Add the Wet Mix and knead for about 10 minutes. (If your bread machine has a dough cycle-two kneads with a long rest in between-use that cycle. Otherwise, just run it through the kneading part and then unplug it and let it rest in the cover container, then plug it in again for another knead, then remove it.) Let rest for about 1 hour, covered. You can make your Cooking Broth at this time and have it ready. Then knead it for 10 more minutes.

(NOTE: You can knead by hand, too, but it's tougher than bread dough. You may want to let the seitan dough sit for a while to soak up the liquid more thoroughly before you starting hand-kneading.)

COOKING METHOD #2.) Preheat the oven to 325 degrees F. Flatten the dough out into a long piece and cut in half equally to make two rectangles. Form into 2 loaves. Place each loaf in an oiled 8 and1/2" x 4 and 1/2" loaf pan and press down a bit with your hand. Mix the Cooking Broth ingredients in a small bowl and pour 1/2 over each loaf. Cover each loaf pan with foil and place in the oven. Immediately reduce the oven heat to 200 degrees F. Bake for 3 hours. Turn the loaves over, carefully loosening around the edges and from the bottom with a small, thin spatula first. The loaves will have puffed up quite a bit by now, but they will flatten out as they cook further. Turn heat back to 325 degrees F. Cover loaves and bake for 30 minutes. Turn them over again, cover and bake 15 minutes. Turn them over again and bake 15 more minutes, covered. Turn them over one last time and bake 5-10 minutes.

(Recipe from Bryanna's Vegan Feast)


GOLDEN GRAVY

Ingredients:

  • 1/2 c. nutritional yeast

  • 1/2 c. whole wheat flour

  • 1/3 c. canola oil

  • 1/2 c. chopped onion

  • 2 t. minced garlic

  • 2 t. chopped fresh thyme, or 1 t. dried

  • 2 t. chopped fresh sage, or 1 t. rubbed dried (or I used 3/4 t. powdered sage)

  • 4 c. water

  • 1/4 c. tamari

  • salt to taste

  • ground black pepper to taste

DIRECTIONS

Stir yeast and flour in heavy skillet over medium heat for five min or until fragrant.

Heat oil in large heavy saucepan over medium heat. Add onion, saute for 10 mins, or until it begins to brown. Add garlic, thyme, sage, and saute for 30 secs, or until fragrant. Whisk in flour mixture thoroughly, then whisk in water, tamari, salt, and pepper. Bring to a simmer, whisking frequently, and continue until reaches desired thickness. Strain into a bowl to serve.

(Recipe snagged from Vegan Favorites where it was reposted from Real Food Daily)

Thursday, March 12, 2009

Speaking of Breadmakers...

My mom got me one for my birthday, and I love it already, for the simple reason that it means NO MORE KNEADING!

Consequently, I made pizza this past weekend to see what it would be like to not find myself cussing under my breath for 10 minutes.

And apparently the answer is: soapy and kind of chemically.

I have no clue why, but despite my dough being the perfect consistency, it was weirdly soapy tasting. Like yeast if yeast were an angry Bruce Banner of the tongue:


I'm not sure why it was so weirdly soapy and uber-yeasty tasting unless my yeast was funk, but I ate it anyways, trepidatiously the first day (worrying that I would die a "death by pizza") but less so the next day when I was still living.

Regardless: I recommend the topping combo. I snagged the idea from Web of Life which is the only place I've ever had vegan bbq chicken pizza. And I have to say: I liked mine just as much as theirs.

There's no actual recipe, but here's what was on it: vegan "chicken" browned in a pan, caramelized onions, bbq sauce, and vegan cheddar.


Just steer clear of soapy yeast.

Wednesday, November 30, 2011

Favorite Quick Seitan Recipe


I have come to loathe making seitan because one attempt will turn out beautiful, the next all bloated and mushy. There's no consistency and dependability in the recipes I've tried using (namely the Veganomicon and VwaV recipes). So god(dess) bless Terry Hope Romero for her steamed white seitan recipe. Finally a seitan recipe that has thus far been fail-proof. The consistency is perfect--dense and chewy. It makes a bunch. And it only takes about 15 minutes to put together and 30 minutes to steam, compared to the hour+ for most boiled recipes. It's seriously great.

I *DO* season it differently, however, and the below recipe has been adjusted to include my seasonings (it's a very minimal change, poultry seasoning instead of curry powder)--what it yields will taste a bit more chickeny.

INGREDIENTS:
  • 1.5 c. vegetable broth (or chicken flavoured broth)--I also add a dash of soy sauce

  • 4 garlic cloves (grated)

  • 2 T. olive oil

  • 1.5 c. vital wheat gluten

  • 1/4 c. chickpea flour (you can also sub in all-purpose, but the chickpea's definitely more flavorful)

  • 1/4 c. nutritional yeast

  • 1 t. dried thyme

  • 1/2 t. paprika

  • 1/2 t. poultry seasoning

  • 1 teaspoon salt (to taste)

DIRECTIONS

In a jug whisk together broth, garlic, olive oil. In a large bowl combine wheta gluten, chickpea flour, nutritional yeast, thyme, paprika, poultry seasoning, and salt. Form a well in centre of dry ingredients and stir well with rubber spatula until dough leaves side of the bowl.

Knead for 2-3 mins to develop gluten. I cheat at this stage and use the Kenwood chef to do the kneading on power 1 or 2.

Leave dough to rest for 10 min, knead again for 30 seconds.

Place dough on cutting board and cut into 4 equal pieces.

Tear off 4 X12 inch pieces of foil and place piece of dough in centre of foil, fold the short sides of the foil over the loaf, the fold over the ends the foil should be secure but loose allowing for it to expand. Place in steamer basket and steam for 30 minutes Allow the dough to cool to the touch before chilling in fridge or overnight.

Store seitan in the fridge tightly sealed in a plastic bag for up to 2 weeks or freeze, defrost before use.

(Recipe from Viva Vegan, reposted at Food.com)

Wednesday, August 20, 2008

Spring Panzanella


                                    from Smitten Kitchen


I heart bread. I could eat nothing but bread all day without the slightest bit of angst for fruits or vegetables. And since we all know I harbor resentment against boring lettuce salads, the concept of panzanella (bread salad) BLOWS MY MOTHERF-ING MIND. I mean, a salad of bread: HOW COULD YOU NOT BE TOTALLY SMITTEN WITH THAT IDEA?!?!

So yeah, when I saw Vegan Dad mention this bread salad by Smitten Kitchen on his blog, I was like: Yeah, I'm making this. Immediately.

Plus, I heart leeks. And I heart asparagus. SO HOW COULD YOU POSSIBLY GO WRONG WITH THIS RECIPE??

As I was making this salad, I got to thinking though. And I realized the following:

  1. I think I'm sick of vinegar. Which is like the strangest thing ever. But it may be true.

  2. I am looking forward to cooler weather. I can't wait to shelve the salad recipes, bust out the soup recipes, and start making heavy, warm, love-handle food already.

  3. I think I am prejudiced against yeast. HOW TERRIBLE IS THAT?? Any time I read a bread recipe that calls for yeast, I'm all *muttering under my breath* Fuck that, motherfucker. (Not that this recipe CALLED for yeast, but somehow my brain went there anyways.) AND I'M NOT EVEN 100% SURE WHY! I think it may just be that I automatically KNOW it means kneading something for like 10 minutes, and that IRRITATES me. And yet, something in me really wants to like it. Mostly because it just seems so very Suzy Homemakery, you know?

  4. And now that we're off topic: classism and veganism. That's a topic that I really would like to address on this blog someday soon.

  5. Nutritional yeast: I just keep falling more and more in love. Just when I think I couldn't fall any harder, SLABBAM: right down the stairs.

  6. So did you hear that they're coming out with a new 90210 show?? Not even kidding you.

Anyways, back to the bread salad. Despite my sudden angst over vinegar, I DID like this salad. Mostly because homemade croutons ROCK. I was a little bit flummoxed by the leeks (which Smitten Kitchen DID give a warning about) simply because they didn't stay intact AT ALL while cooking them. They still tasted fine, but they fell all apart. Which makes me think there has to be SOME sort of better way to cook these. But yeah, this recipe isn't anything too complex, but its medley of flavors works well. And also: bread. So it's worth checking out.

INGREDIENTS:

    Croutons:

  • 1/4 c. olive oil

  • 2 cloves garlic, finely chopped

  • 6 c. day-old bread, crust removed, cubed

  • Salt and freshly ground black pepper


  • Vinaigrette:

  • Half a red onion, finely diced

  • 2 to 2-1/2 T. champagne or white wine vinegar (or I used 1.5 T. white vinegar + 1 T. white wine)

  • Juice of half a lemon

  • 1/4 c. olive oil

  • 1/2 t. Dijon mustard


  • Salad:

  • 4 large leeks

  • Salt, to taste

  • 1 pound asparagus

  • 1 small can of white beans, rinsed and drained (or 1 1/2 c. cooked white beans)

  • 1/2 T. nutritional yeast (optional)

DIRECTIONS

Preheat oven to 400 degrees F.

Mix the bread cubes with the garlic, olive oil, salt and pepper in a large bowl. Toss to coat well. Transfer bread to a baking sheet and sprinkle with salt and pepper. Bake stirring once or twice, until the croutons are crisp and lightly colored on the outside but still soft within, about 10 to 15 minutes. Set aside and let cool.

Mix the red onion with the vinegar and lemon juice in a small bowl and set aside for a few minutes before whisking in the remaining vinaigrette ingredients: olive oil and dijon. Set aside.

Cut off dark green tops of leeks and trim root ends. Halve each leek lengthwise to within 2 inches of root end. Rinse well under cold running water to wash away sand. Cover leeks with cold water in a 12-inch heavy skillet. Add salt and simmer leeks, uncovered, until tender, 15 to 20 minutes.

Without draining the cooking water (you will reuse it for the asparagus), transfer leeks to a bowl of ice and cold water to stop cooking, then pat the leeks dry with paper towels. Break off tough ends of asparagus and cook it in the boiling water until crisp-tender, no more than 3 minutes if they’re pencil-thin, more if your asparagus is thicker. Transfer it to another bowl of ice water, drain and pat it dry.

Cut the leeks and the asparagus each into 1-inch segments–the leeks will be especially slippery and prone to separating; hold firm and use a sharp knife! Place pieces in a large bowl and mix in beans and cooled croutons. Pour vinaigrette over and toss well. Season with salt and pepper. (I also sprinkled about 1/2 T. or so of nutritional yeast over it all--the original recipe calls for parmesan on the croutons, so I wanted to give it a hint of cheesiness without overdoing it.)

(Recipe from Smitten Kitchen)

Thursday, February 19, 2009

Whole Wheat Beer Bread

                                   from Vegan Crunk


Putting together this bread was a total Mr. Wizard experience.

I mixed all the dry ingredients together then dumped in my can of beer and...


Well, that, but in a more beer-foamy and less flamey kind of way.

It wooshed up into a big foamy beer-swirl that kept getting bigger and bigger as I whisked and then all the sudden FOOMP it instantaneously all vanished into a doughy mix.

Fun shit.

And despite my doubts about the bread--the directions said to "pour" it into my bread-pan, but the dough was thick and in no way "pourable" so I was a bit concerned--it came out quite good.

The top didn't smooth out 'cause of the thickness of the dough, but it gave it a kind of nice crumble-crunch to an otherwise soft squish bread.

The only other weird thing was that I *did* use sea salt (though only 1/4 of the amount called for) and it gave the bread the illusion that it had mold-pockets. The salt granules didn't dissolve all the way, they sort of just blossomed out into a white-pocket surrounding each granule, so I was forced to assure the folks eating it that it really wasn't moldy.

Ultimately though, I liked this bread. Mostly because it was super easy and didn't require kneading. And granted, I like crusty bread, and this certainly isn't that. But I'd definitely make it again, this time with a deeper stout-type beer (instead of the Brooklyn Winter Ale I used) as it's real good bread for dipping.

Also, it's fun to eat at work.

INGREDIENTS:
  • 3 c. whole wheat pastry flour (I just used whole wheat flour)

  • 3 t. baking powder

  • 1-1/2 T. sugar

  • 1 t. sea salt (I used 1/4 t.)

  • 12 oz. of tasty vegan beer

  • 1 Tbsp. soy margarine

DIRECTIONS

Preheat oven to 350 degrees. Mix dry ingredients. Add beer. Stir to combine. Pour into a lightly greased loaf pan.

Bake for 30 minutes, and then brush margarine over the top.

Bake an additional 20-25 minutes or until a tooth pick inserted in the center comes out clean.

(Recipe from Vegan Crunk)

Tuesday, April 14, 2009

Check Out Our First Contest Entry!

So cute, I kinda wanna tweak its nipples... Just a little bit.


      from Wanting Kneading

To enter some boobs of your own, check out the Nippular Cookbook Contest Guidelines HERE.


Wednesday, October 11, 2006

Sweet Potato Gnocchi with Walnuts, Green Tomatoes, and Cilantro-Pumpkin Seed Pesto


So as I mentioned earlier this week, I decided to try making some homemade gnocchi this weekend, something I'd never done before. But I love me some gnocchi, so I figured, what the hell... And damn if I wasn't pleased that I decided to try it out. Store-bought gnocchi doesn't even come CLOSE to the fresh stuff.

Overall, I actually really quite liked this dish (which I invented all by myself--look, ma, no hands!). And in the making of the dish, I thankfully only ran into a few real issues.

The first was the gnocchi dough--given that I've never made gnocchi before, I wasn't quite sure what to expect. Bryanna's Nonna's Italian Kitchen cookbook gave some tips for making regular potato gnocchi, so I used those to guide myself. She warned that the dough would be sticky, so you want to add the flour slowly until it's sticky but not SO sticky that you can't work with it; then you should stop, because the less flour you add, the more tender the gnocchi will be. And damn if she wasn't right about the gnocchi dough being sticky--I added probably what was close (or maybe even slightly more) than the 1 3/4 c. of flour, and it STILL was a fricking bear to work with. My tip is this: flour up those hands, flour up that fork, and flour up your table. Flour flour flour! Be liberal, as I don't think it will hurt much of anything, and it'll make you a lot less liable to want to throw the wad of orangey dough onto the flour and stomp on it.

The other issue I ran into with this dish was the pesto. As I was trying to go for autumnal-themed food (pumpkin soup, sweet potato gnocchi), I decided to try out the cilantro-pumpkin seed pesto recipe from The Complete Vegan cookbook. However, I must warn you that this is some potent, spicy shit. Like mega-potent. And mega-spicy. So much so that Mo actually admitted that she wasn't too keen on it, though she loved the gnocchi and walnut-green tomato mix. (You know you're good friends with someone when they can have the openness and candor to tell you this, and your feelings aren't even hurt a bit.) I actually quite liked it myself, but only in really really really small doses. For a serving of gnocchi, I'd say you'd be pushing it if you served any more than a tablespoon of it on top. That's how strong it is.

The other problem I ran into with this pesto recipe is the pumpkin seeds. Apparently pumpkins seeds are the cockroaches of the food world--they just WILL NOT DIE no matter how much time you spend trying to smash them to pieces. This was probably the most aggravating aspect of the whole dinner. I tried food-processing the raw pumpkin seeds first with no luck. They barely even wore down. Then I added the other pesto ingredients, and that only seemed to help minimally. It took much much much spinning of my food-processing blades (and probably some burning out of my motor) to finally get them ground up fairly reasonably. And even still, we kept running across little deviant still-whole pumpkin seeds. It was sheer madness. So be forewarned.

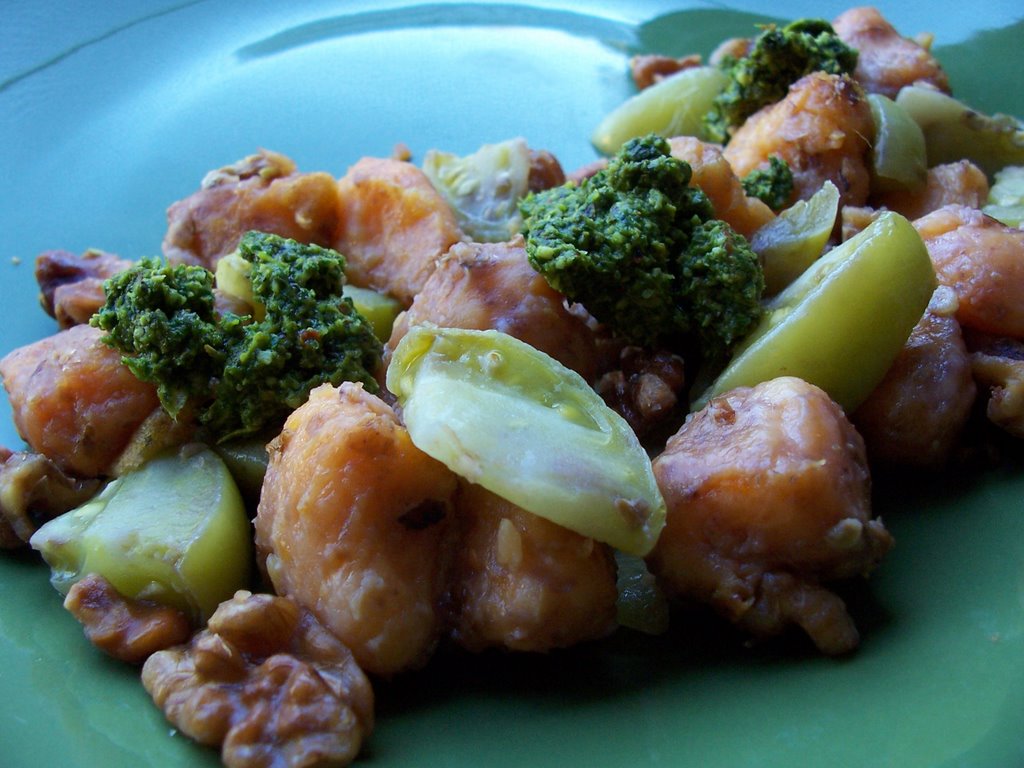
All that being said and done, I was very happy with this dish. The gnocchi were plump and wonderfully gloriously tender (despite me being worried about this), and the walnuts, green tomatoes, and pesto all mingled in a delightfully earthy but zingy mix. And it tasted like autumn. So there!

INGREDIENTS:

The Cilantro and Pumpkin Seed Pesto

(I am actually posting this recipe--from The Complete Vegan--since it's not really a whole recipe, and I highly doubt that it'll keep you from running out and buying the cookbook. Consider it a teaser to get you to want more more more Complete Vegan recipes. *Trying to make myself feel less guilty*)
  • 1 c. chopped fresh cilantro

  • 1 c. chopped fresh parsley

  • 1/4 c. extra-virgin olive oil

  • 1/4 c. raw unsalted pumpkin-seeds

  • 2 T. fresh-squeezed lime juice

  • 1 T. dried oregano

  • 2 cloves garlic, minced

  • 1/2 t. ground cumin

  • 1/2 t. salt

  • 1/4 t. dried red chili flakes (cutting this down to 1/8 t. or something will probably help combat some of the fierce spiciness)

  • 1 T. nutritional yeast (this is not in the original recipe--I was trying to despicify it a bit after taste-testing)

Food process all of the above, except for the olive oil. Once it is processed, add the olive oil slowly while the blade is still running until it is mixed throughout.


The gnocchi
  • 2 lbs. sweet potatoes (about 2 large sweet potatoes)

  • 1 3/4 c. flour

  • 1/4-1/2 t. salt

Remove the skins of the sweet potatoes and then steam them both until they are tender. Immediately mash them up (while still hot) and add the salt. Gradually add the flour in (I did at about 1/2 c. at a time), mixing until the dough is sticky but workable. (Remember: the less flour you end up using, the more melt-in-your-mouth tender they'll be.) Flour your table or whatever you'll be kneading the dough on, as well as your hands. Knead for 2-3 minutes. Roll chunks of the dough out into 3/4-inch worm-like strings. Cut into 3/4-inch chunks. For each little gnocchi-chunk, take a fork (which you'll probably also wanna flour a bit) and press the chunk against the tines with your thumb--the point is to leave the lines of the fork on one side and your thumb imprint on the other. Once you get through all the dough (the quantity in the recipe I made makes enough gnocchi for probably 6-10 servings, in my opinion; I only made gnocchi from about half the dough, and froze the rest--which hopefully is an ok thing to do; I must look this up--and it made about 4 small-sized servings in this particular dish), start dropping the gnocchi into boiling water in small batches. Once they rise to the top, remove and drain them. (You may wanna taste-test a couple and make sure you shouldn't let them float on the top for a bit longer if they're TOO tender.) Repeat with all the remaining gnocchi until you're done.


The complete dish
  • 1/2 - 1 lb. green tomatoes, diced

  • 1 c. walnuts, toasted

  • Cilantro-pumpkin seed pesto

  • 1/2 of the sweet potato gnocchi you made above

  • 1/2 - 1 T. olive oil

Heat up the olive oil in a skillet. Toss in the green tomatoes and gnocchi and a little bit of salt. Fry on low/medium until the green tomatoes have softened and the gnocchi has browned just the slightest. Remove from the heat. Throw in the walnuts and mix. Serve a couple large spoonfuls of the mixture on a plate and top with some cilantro-pumpkin seed pesto (1/2 T. - 1 T.). Enjoy.

Servings: Given all the quantities above, I can tell you this: You will have excess pesto left-over (since you'll only want to use very little because of the spiciness). I just froze it. The complete dish quantities assume that you only use 1/2 batch of the sweet-potato gnocchi dough (so you can either just cut the quantities in half and make a half-batch of the gnocchi recipe--if you don't want leftover dough, or you can make the complete amount and store the rest for a later date). Given all that, this should serve about 4, particularly if accompanied by soup and fresh bread.